mmodeler User Guide
English | 日本語

Overview
mmodeler is a Blender-inspired 3D modeling tool optimized for touch operation on smartphones and tablets. Built with WebGPU and JavaScript, it allows you to control the camera, edit meshes, add primitives, save/load files, and perform organic shaping using a dedicated Sculpt Mode—all through intuitive gesture-based controls.
How to Run
- Open ./mmodeler.html in a browser with WebGPU support.
mmodeler does not depend on external libraries or servers; once launched, everything runs locally in your browser.
You can access the tool here:
https://jun-mizutani.github.io/webg/samples/mmodeler.html
Mobile Control System
To address the "finger occlusion" problem (where your finger hides the area being edited), mmodeler utilizes a "Preview then Confirm" workflow.
Basic Gestures
The most important operation is the double-tap on geometry, which opens the Command Palette to execute most functions.
- One-finger Drag: Camera orbit.
- Two-finger Drag: Camera pan.
- Two-finger Rotation: View roll. Inverts the detected finger-rotation angle before rotating around the current view axis.
- Pinch: Camera zoom.
- Short Tap:
- Object Mode: Select an object.
- Edit Mode: Select a vertex or face depending on the active tool.
- Add Vertex Tool: Add a vertex at the tap location.
- Double Tap:
- On Geometry: Opens the Command Palette while maintaining the current selection.
- On Empty Area: Prepares "Box Selection" (if the scene is empty, it opens the Command Palette).
- In Sculpt Mode (Empty Area): Toggles between "Camera Control" and "Brush Stroke".
- Long Press:
- On Geometry in Object/Edit Mode: Toggles between Object Mode and Edit Mode.
- On Empty Area in Object/Edit Mode: Opens the same object info overlay as the
Infobutton. - On Geometry in Sculpt Mode: Does not switch modes. It is disabled to avoid conflicts with brush operations.
- On Empty Area in Sculpt Mode: Opens the same brush settings overlay as
Brsh.
- Upward Flick: Quickly switch to "Sculpt Mode" by flicking up from the view dock or the bottom edge of the canvas.
Special Button: Top-Left "↑" Button
The role of this button changes depending on the mode:
- Object/Edit Mode: "Additive Selection (Shift equivalent)". While ON, tapping adds to the selection. Tapping a selected element deselects it.
- Sculpt Mode: "Brush Armed". While ON, one-finger drags act as brush strokes. While OFF, camera orbit is prioritized.
Command Palette
A 4x4 grid menu opened by double-tapping. In Object/Edit Mode, you can cycle through 4 pages using the Next button. In Sculpt Mode, it switches to a specialized single-page palette. The palette is automatically positioned based on the tap location to avoid hiding the target area.
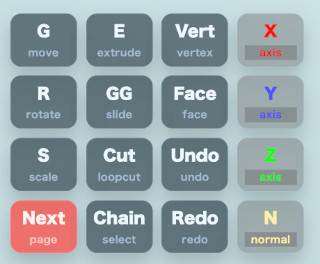
Page 1: Basic Editing & Axis Constraints
Transform operations follow the flow: Select Tool $\rightarrow$ Drag to Preview $\rightarrow$ Tap to Confirm.
| Button | Description |
|---|---|
G | Move: Move selection. Drag to position, then tap to confirm. |
E | Extrude: Extrude selected faces/vertices. Drag to adjust distance, then tap to confirm. |
Vert | Vertex Select: Switch selection mode to vertices. Used for moving, deleting, or adding vertices. |
X | X-Axis: Constrain the next transform to the world X-axis. Press again to return to Free. |
R | Rotate: Rotate selection. Drag to set angle, then tap to confirm. |
GG | Edge Slide: Slide a vertex along an edge (only for midpoint vertices). |
Face | Face Select: Switch selection mode to faces. Used for extruding, deleting, or loop cutting. |
Y | Y-Axis: Constrain the next transform to the world Y-axis. Press again to return to Free. |
S | Scale: Scale selection. Drag to set multiplier, then tap to confirm. |
Cut | Loop Cut: Split quad faces. For single faces, pick direction via preview line, then tap to confirm. |
Undo | Undo: Revert the last operation (transform, primitive addition, etc.). |
Z | Z-Axis: Constrain the next transform to the world Z-axis. Press again to return to Free. |
Next | Switch to the next page. |
Chain | Chain Select: Select a sequence of vertices connected by quads based on the chosen direction. |
Redo | Redo: Re-apply an undone operation. |
N | Normal Axis: Constrain transform to the average normal of selected faces/vertices. |
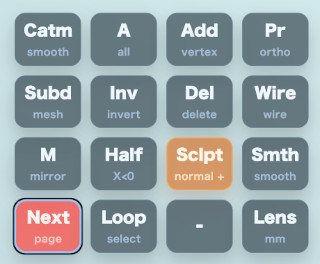
Page 2: Selection, View & Mode Switching
| Button | Description |
|---|---|
Catm | Catmull-Clark: Smoothly subdivide the entire mesh for organic shapes. |
A | Select All: Select all objects (Object Mode) or all vertices/faces (Edit Mode). |
Add | Add Vertex/Face: Create a face (if 3-4 vertices selected), otherwise switch to Add Vertex tool. |
Pr | Projection: Toggle between Perspective and Orthographic views. |
Subd | Subdivide: Subdivide quad-only meshes to increase polygon density. |
Inv | Invert: Invert the current selection. |
Del | Delete: Delete selected objects, vertices, or faces. |
Wire | Wireframe: Toggle wireframe view. Allows selecting hidden vertices when ON. |
M | X-Mirror: Enable symmetric editing across the X=0 axis. |
Half | Select X<0: Select elements with a negative X coordinate. |
Sclpt | Sculpt Mode: Enter Sculpt Mode with the Draw brush (positive direction). |
Smth | Smooth Shading: Enable smooth shading (visual only; geometry is unchanged). |
Lens | Lens: Switch camera focal length presets. |
Next | Switch to the next page. |
Loop | Loop Select: Select a loop of vertices starting from a loop-cut midpoint. |
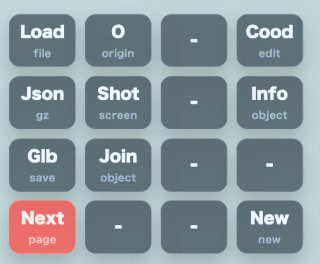
Page 3: File & Scene Management
| Button | Description |
|---|---|
Load | Load: Load a model file or saved ModelAsset JSON from local storage. |
O | Origin: Reset the active object's origin to the world origin. |
Cood | Coordinates: Show/edit vertex coords (Edit Mode) or Brush settings (Sculpt Mode). |
Info | Info: Display object size (Bounding Box), vertex count, and face count. |
Json | Save JSON: Save the scene as a compressed .json.gz file. |
Shot | Screenshot: Save the current canvas as an image. |
Glb | Save GLB: Export the scene as a GLB file for other tools. |
Join | Join: Combine multiple selected objects into one. |
Next | Switch to the next page. |
New | New Scene: Clear the scene and start over. |
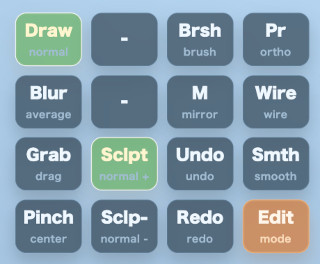
Sculpt Mode Specialized Page
In Sculpt Mode, a specialized single-page palette replaces the standard one.
| Button | Description |
|---|---|
Draw | Draw Brush: Move vertices along the normal. Inflates with Sclp+, deflates with Sclp-. |
Brsh | Brush Settings: Edit Radius, Strength, and Falloff Shape via overlay. |
Pr | Projection: Toggle between Perspective and Orthographic views. |
Blur | Blur Brush: Average vertices to smooth the surface. |
M | X-Mirror: Apply sculpt deformation symmetrically across the X=0 axis. |
Wire | Wireframe: Toggle wireframe display. |
Grab | Grab Brush: Pull vertices in the direction of cursor movement. |
Sclp+ | Positive: Set brush direction to positive (e.g., inflate). |
Undo | Undo: Revert the last stroke or operation. |
Smth | Smooth Shading: Enable smooth shading (visual only). |
Pinch | Pinch Brush: Squeeze vertices toward the cursor center. |
Sclp- | Negative: Set brush direction to negative (e.g., deflate). |
Redo | Redo: Re-apply an undone operation. |
Edit | Return to Edit Mode: Leave Sculpt Mode and go back to Edit Mode. |
Page 4: Primitives
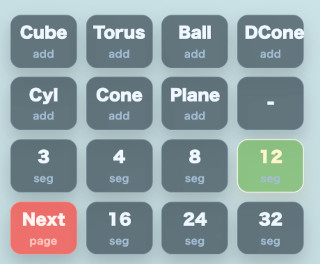
- Shapes: Add
Cube,Torus,Ball,DCone,Cyl,Cone, orPlane. - Segments: Use buttons
3to32to set the polygon density for the next primitive.
Detailed Feature Specifications
Transform Confirmation Flow
For G/R/S/E/GG operations:
- Drag: Real-time preview of the transformation. The preview is maintained even after releasing the finger.
- Adjust: Drag again to fine-tune the position from the previous point.
- Confirm: Short tap to finalize the transform and commit it to history.
Sculpt Mode Details
- Brush Cursor: When hitting a surface, an ellipse is displayed, rotated to match the surface normal. The size is dynamically projected from the 3D
brushRadiusto screen pixels. - X-Mirror / Edit: Use
Mto toggle symmetric sculpting andEditto return to Edit Mode. - Falloff Shapes:
Sphere: Smooth, spherical attenuation.Triangle: Linear attenuation based on distance.Peak: Strong center with sharp attenuation.Flat: Uniform application within the radius.
- Long Press: In Sculpt Mode, long-pressing an empty area opens the same brush settings overlay as
Brsh, while long-pressing geometry does not switch modes. In Object/Edit Mode, long-pressing geometry still toggles modes.
Box Selection
- Double-tap an empty area to start.
- Drag to define the area. Upon releasing, the box remains visible ("Awaiting Confirmation").
- Adjust: Drag again to redraw the box if the area is incorrect.
- Confirm: Tap to select all elements within the box.
Loop Cut
Perform a Cut by selecting a quad face in Edit Mode.
- Propagation: The cut spreads from the starting face to adjacent quad faces.
- Direction: For single faces, pick the direction via the green preview line, then tap to confirm.
- X-Mirror: When ON, the cut direction is mirrored to the opposite side.
Loop Selection
Select a chain of midpoint vertices created by a Loop Cut.
- Start: Select a midpoint vertex in "Vertex Select" mode and run
Loop. - Direction: The tool identifies the midpoint and expands selection toward the opposite midpoint.
Chain Selection
Select a sequence of vertices connected by quad faces.
- Start: Select a starting vertex in "Vertex Select" mode.
- Direction: Pick the edge direction via the preview line, then tap to confirm.
- Termination: Selection stops at corners (90°), triangles, or pentagons.
Subdivision
- Subd: Subdivide quad-only meshes by 1 level (1 quad $\rightarrow$ 4 quads).
- Catmull-Clark: Reconstruct the mesh using face/edge midpoints for a smooth, rounded surface.
Selection & Display
- Markers: Selected vertices are marked red. Edges with both endpoints selected also appear red.
- Back-selection: When
Wireis ON in Edit Mode, vertices hidden behind the mesh can be selected. - Smooth Shading:
Smthtoggles visual shading without changing the vertex structure. - Additive Selection: Use the
↑button as a Shift key to add/remove elements from the selection.
View Dock
Quickly switch views using buttons at the edge of the screen:
X / -X: Side / Reverse Side.Y / -Y: Top / Bottom.Z / -Z: Front / Back.
Switching views resets the camera target distance and resets the view roll to 0.
Blender Integration
Exchange data via .json or .json.gz using the provided addon (blender_modelasset_io.py).
- Axis Conversion: Automatically converts between Blender (Z-up) and mmodeler (Y-up).
- Consistency: Handles negative scales or mirrors in Blender by flipping polygon loops during export, ensuring correct face orientation in mmodeler.